


Introduction
Holon.ist is an open world mobile music platform that lets users create their own musical mappings from real-world data.
Holon.ist gathers sensor data and can output MIDI and OSC to control software and hardware instruments.
Overview
Notable features:
- Holonic Source integration for Ableton Live, Reaktor 6 Blocks, VCV Rack and miRack
- User defined postures
- Activity type
- Step rate
- Heart rate
- Accelerometer, gyroscope, magnetometer
- Local weather
- Distance, speed
- Locations
- GIS data: Land Use/Land Cover, Points Of Interest
- Course/heading
- Solar/lunar tracking
- Atmospheric pressure
- Ableton Link support
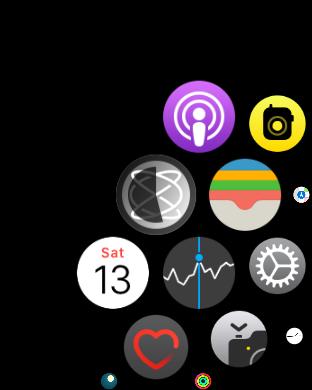
- Apple Watch app
- Apple AirPods Pro/Max support
- Suunto Movesense support
- Embedded Pure Data
- Embedded miRack
- JavaScript editor
- Sensor data recording and playback
Some Holonic scenarios:
- Use non-volitional micromovements for subtle accents or rhythmical modulations.
- Pre-compose for motion with adaptive mappings, including learned postures.
- Use ancillary or accompanying gestures to augment your other instruments.
- Sonify local weather and astronomical events.
- Use activity types as mode switches, for example walking to automotive.
- Use biosignals musically for embodied cognition and biofeedback loops.
- Control lights, stage effects, and video rigs physiologically for fully immersive experiences.
- Use sensors to turn everyday objects into willing musical agents.
- Use your favourite Link-enabled apps at all times, synced and controlled by Holon.ist.
When used passively, Holon.ist leaves your hands free for conventional instruments, try controlling timbre and effects with your head (requires bandana, possibly keytar). Add a Movesense on your foot for pedal action anywhere.
Menu
The Holonic logo serves as the power button. It is always pointing towards the sun. Turn the app off to conserve battery when not in use.
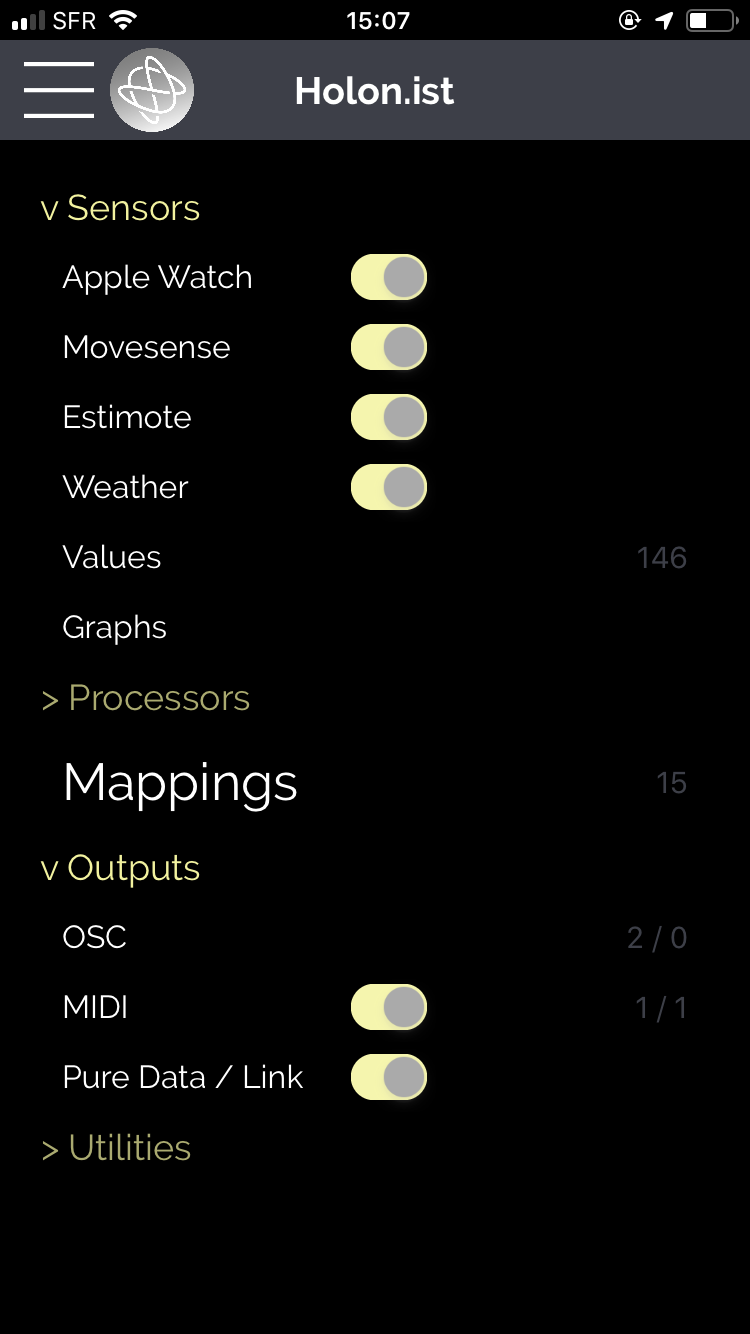
Sensors
This section lets you configure the inputs.
Apple Watch
Ensure that the Apple Watch Holon.ist app has completed installation.
Reopen Holon.ist after the Watch app has completed installation and ensure that the feature is activated under Sensors in the menu.
Using an Apple Watch with Holon.ist gives you the option of syncing your entire studio directly from your heart rate using Ableton Link. See the Pure Data / Link section of the manual.
Please note that some Apple Watch users may experience issues, such as connection failure or delayed signals. Restarting the Apple Watch and iPhone usually resolves these problems.
AirPods Pro/Max
to be documented.
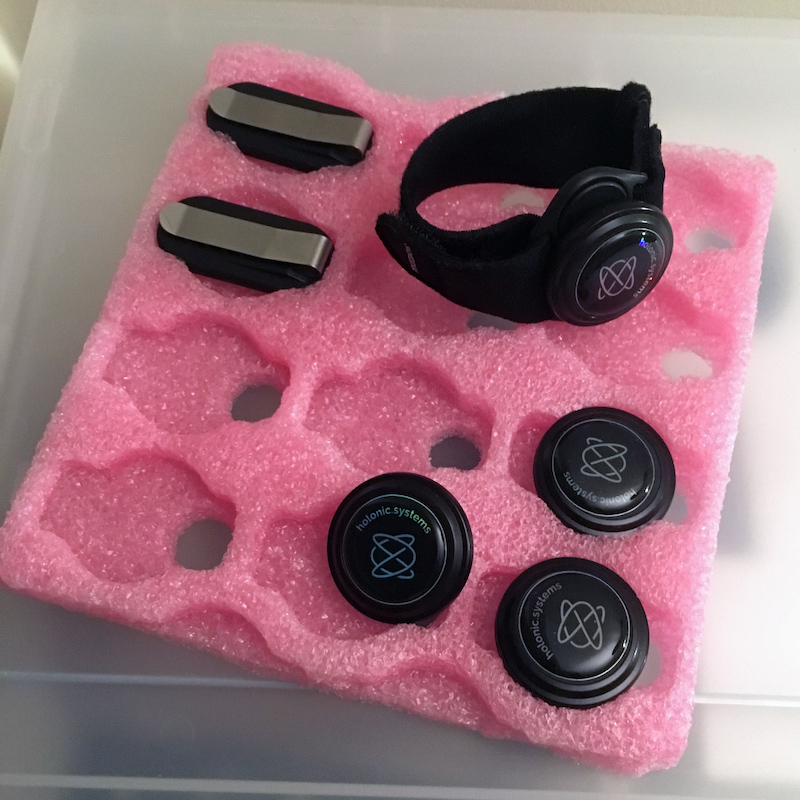
Suunto Movesense
Originally created by Finnish sports watch experts Suunto, Movesense smart sensors can track sports, health, equipment, machinery – anything that moves. With Holon.ist, these lightweight, shockproof and water resistant sensors integrate human physiology into your music; the user effectively becomes part of the musical circuitry.
Movesense BLE devices require pairing from the Movesense configuration page. Pull down the list to start scanning, tap the desired device to pair. To reorder Movesense devices, drag the icon on the right up or down.
To activate a Movesense, touch the two pins on the back simultaneously. To reset, remove the battery lid using a coin, momentarily disconnect the battery.
Holon.ist requires firmware version 1.5 or greater to be running on your Movesense device. See Movesense Upgrade
Estimote beacon
Estimote beacons are compatible with Holon.ist and include features such as proximity, presence and device motion. Estimote beacons can be used to trigger events or change states when entering a room or location.
Chef’s tip: Place on a door for musical notification of the door opening.
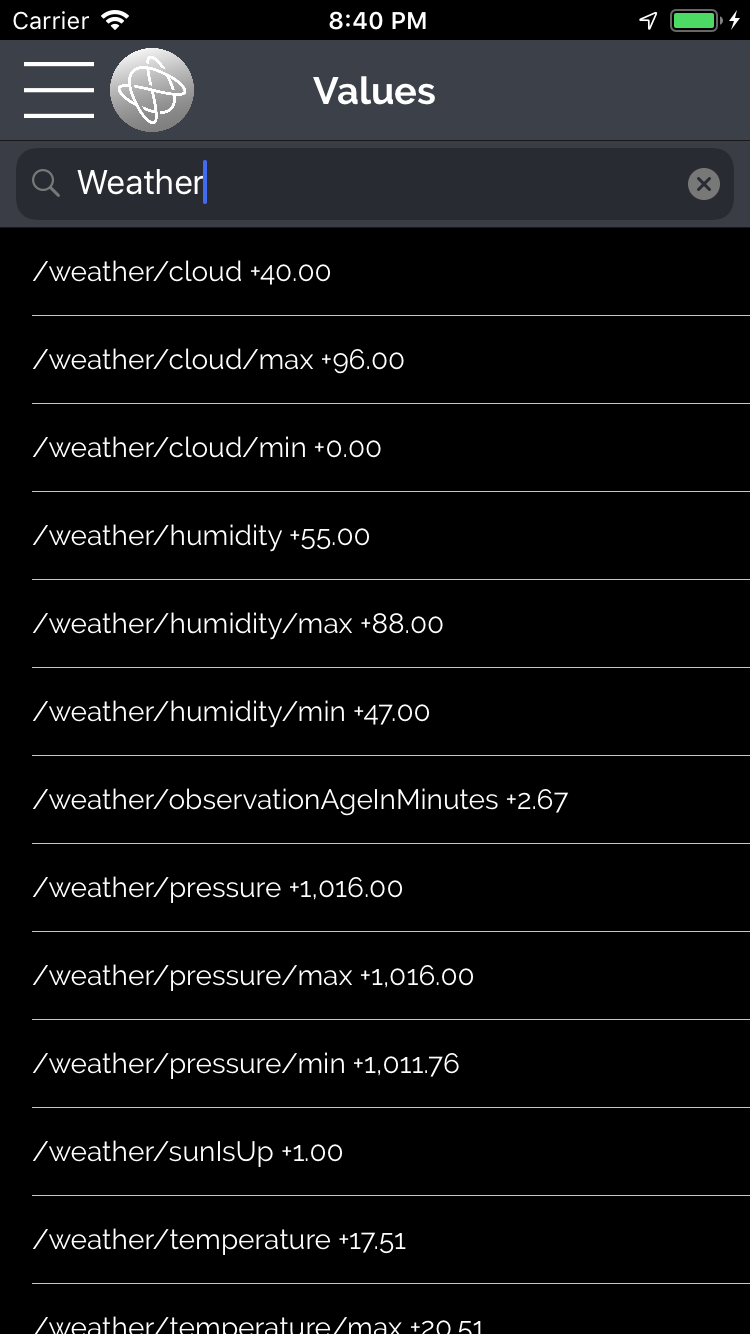
Weather
An included weather service pulls data from OpenWeatherMap for your current location. This data can be used for your patches to reflect your environmental conditions.
See how to use weather information from custom locations.
Serving suggestions: Map the damping of your reverb to humidity and size to temperature. Try controlling any parameter level by wind speed, e.g. noise level.
Sensor values
Here you can inspect all of the sensors available while also seeing their value in real time.
Your host device is named /holonist/* in the list of sensors.
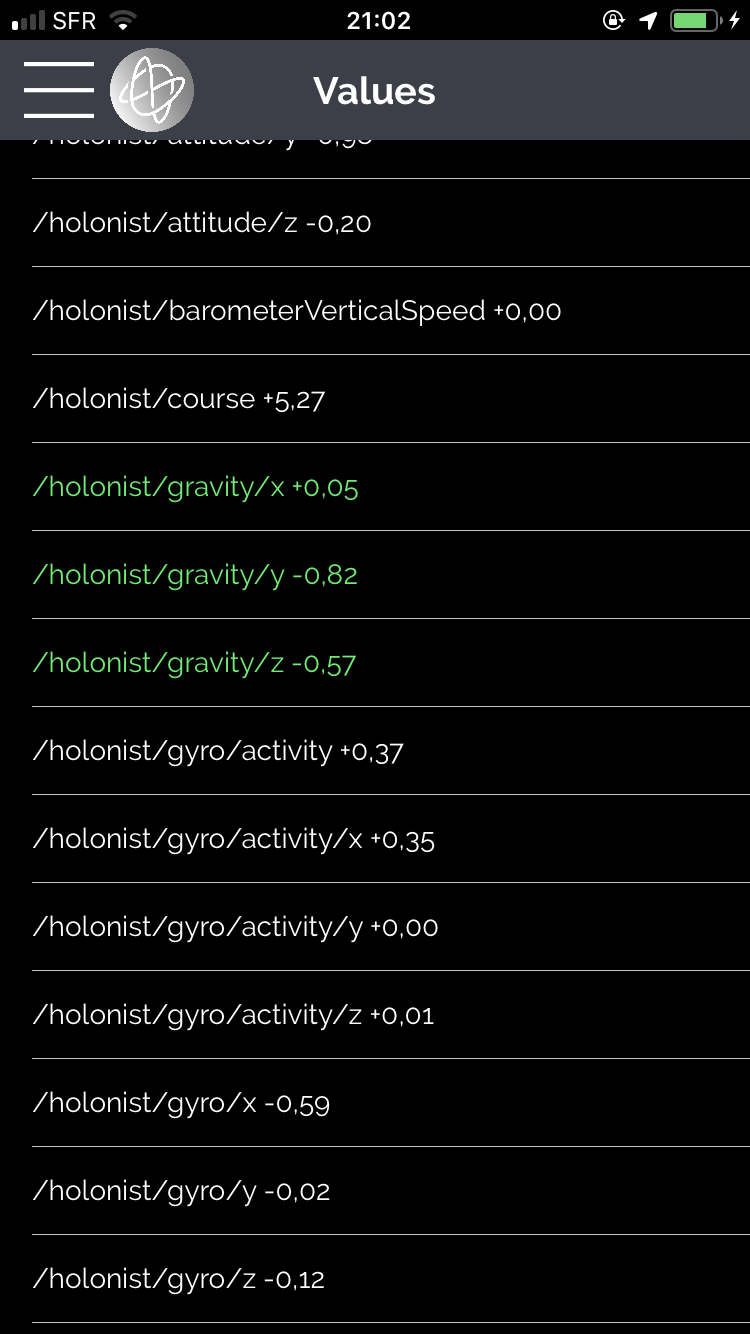
Tapping the sensor name selects it for viewing in the Graph screen. It is possible to select several sensors.
Tip: Tapping an item also copies it to the clipboard, which can then be pasted into the Mappings section’s input field.
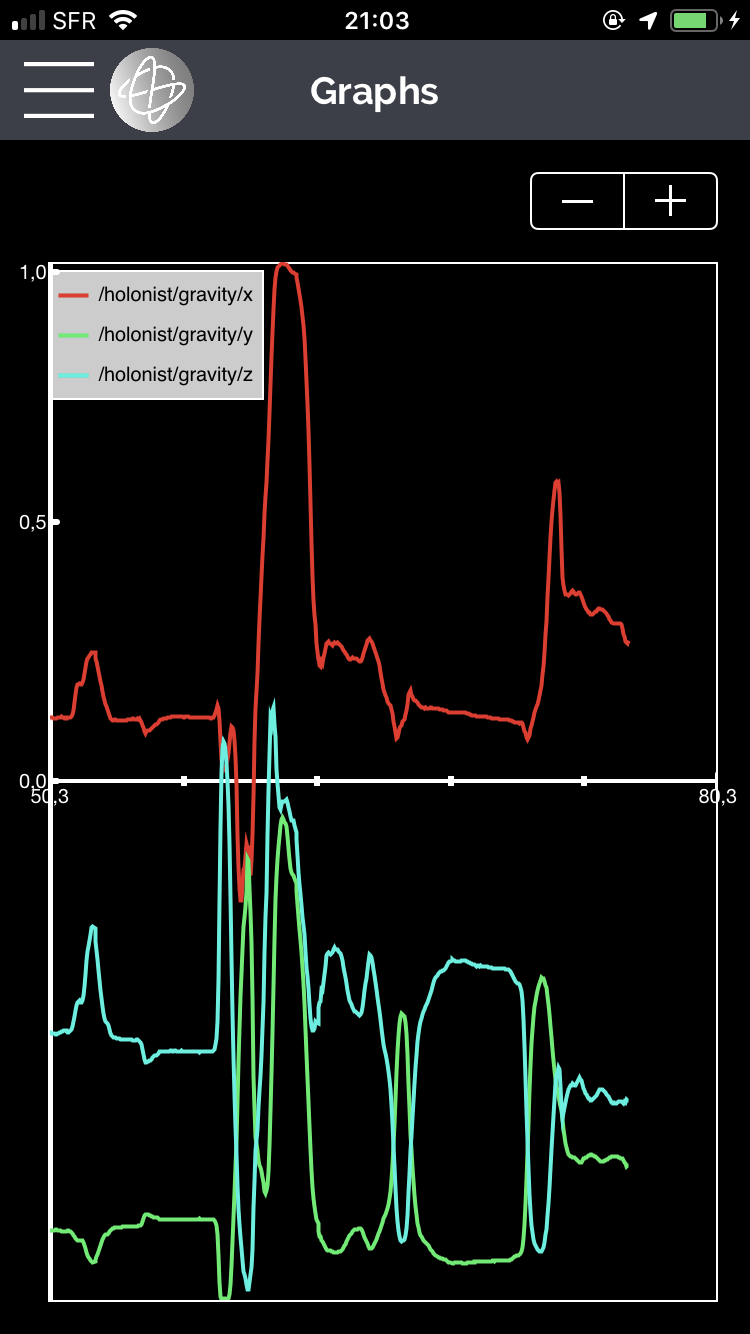
Graphs
Selected sensor values can be visually inspected as graphs in this screen.
Sous-chef’s surprise! It can be useful to view the graph on an external device, such as an iPad. This is possible with OSC peer-to-peer broadcasting.
Processing
Locations
Custom locations based on the current GPS position can be used for musical events. To add a location, press the New button. Press the Learn button to tag a location and enter a name.
The size of the geofence is set by the spatial threshold. The temporal threshold sets the amount of time required within the geofence until a trigger is generated.
This function can be used to map the positional range of one’s movements, for example, by learning the minimum and maximum distance from several locations (you can use the factory defaults in “demo_locations” or enter your own custom locations)
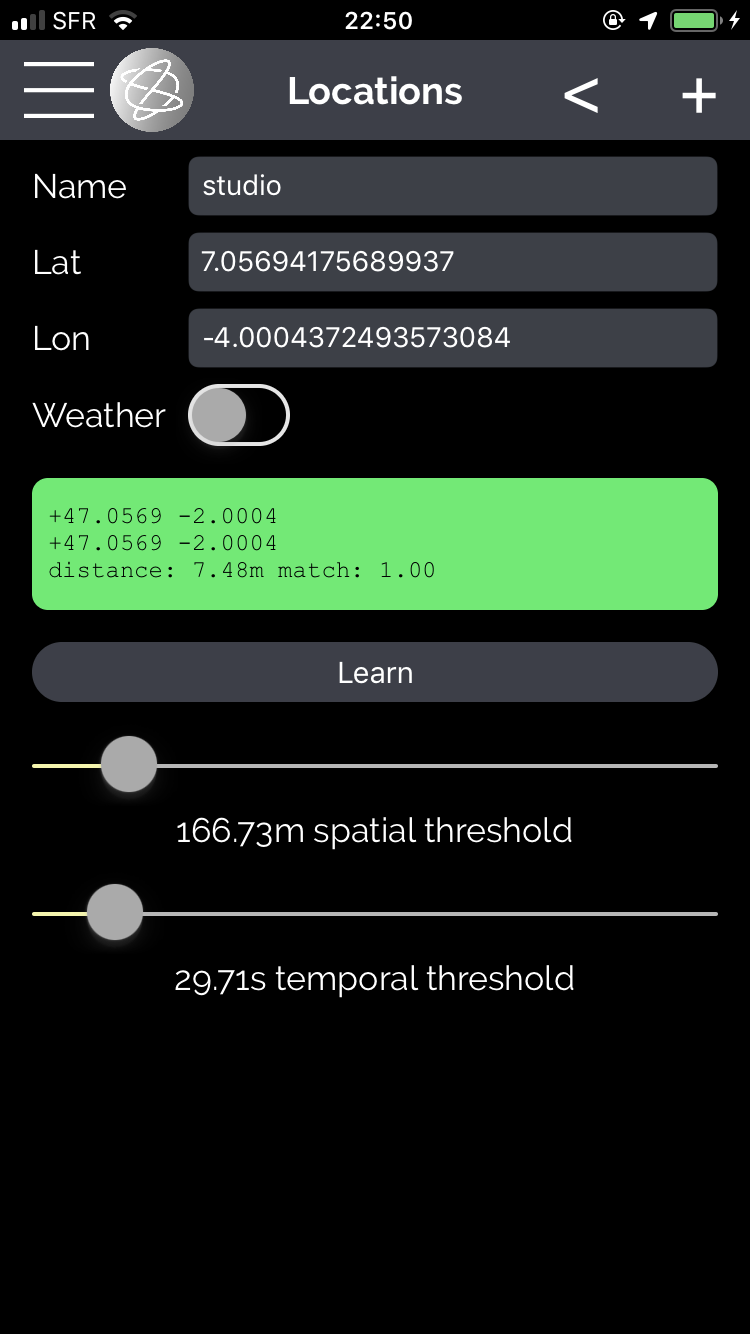
Saved locations appear as available mappings. These virtual sensor values indicate the distance to the geofence and its relation to your heading.
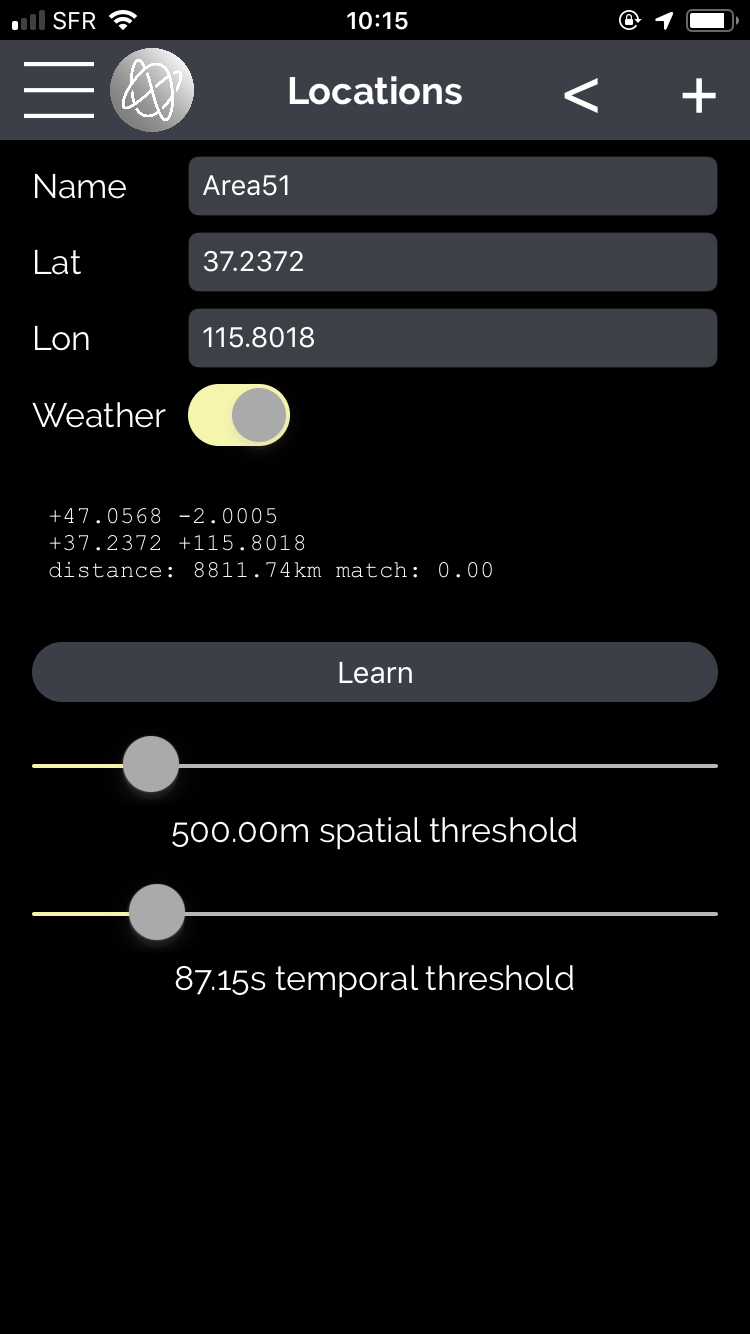
As mentioned in the Weather section above, you can also enter Lat/Lon coordinates to designate remote locations. This lets you use the current weather data from any global location by activating the Weather switch.
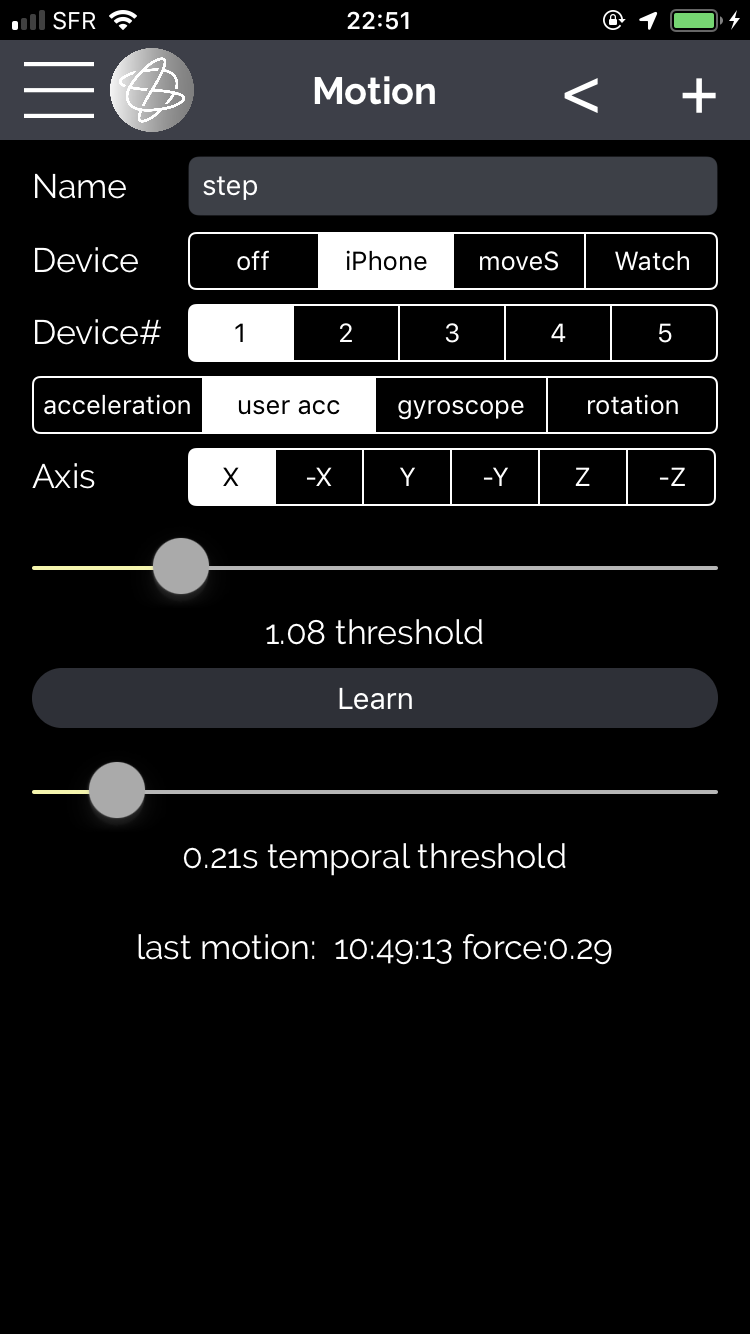
Motion
Movements, such as jumps and steps can be mapped by selecting the device and motion axis.
Postures
Custom postures can be recorded from physical sensors, either onboard or external.
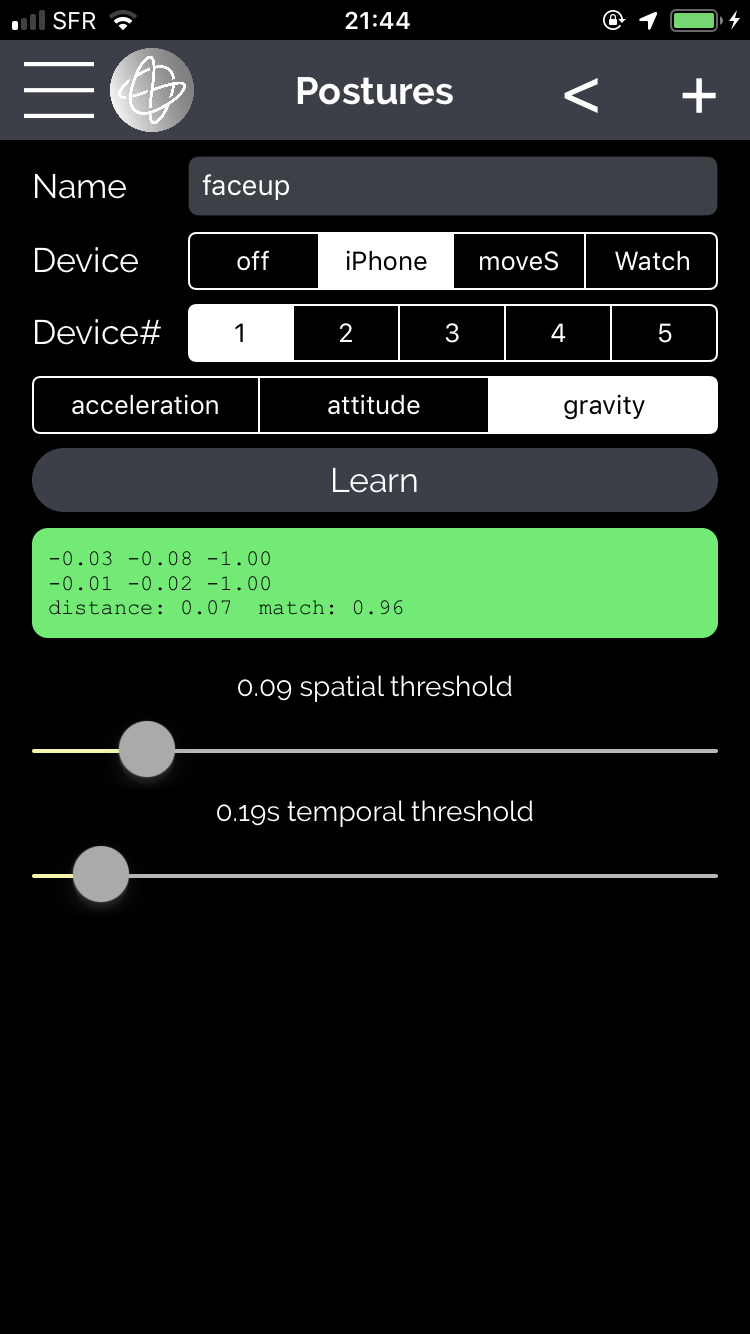
To add a posture, press the New button. After selecting the source device and signal, press the Learn button to record a posture and enter a name to save it.
The range of the posture is set by the spatial threshold. The temporal threshold sets the amount of time required in posture until a trigger is generated.
Saved postures appear as available mappings. These virtual sensor values output either a binary value, or a percentage of the posture match e.g. /postures/name/match.
Scripts
A JavaScript editor is available for advanced users. Once compiled, the script output values become available in the Mappings. Scripts can also access any sensor outputs.
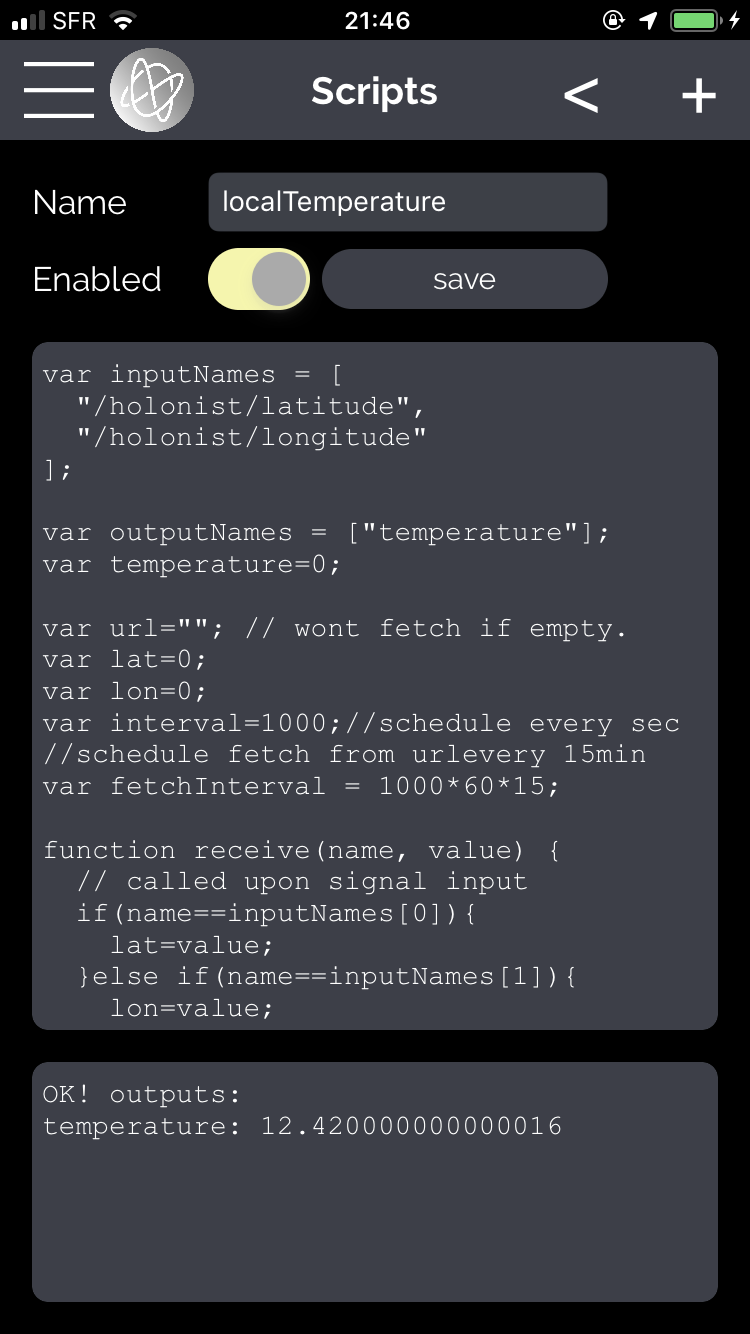
To create a script, press New and select a template. Some example scripts are available, including Comparator, Sum, Scheduler, VLFO, Internet.
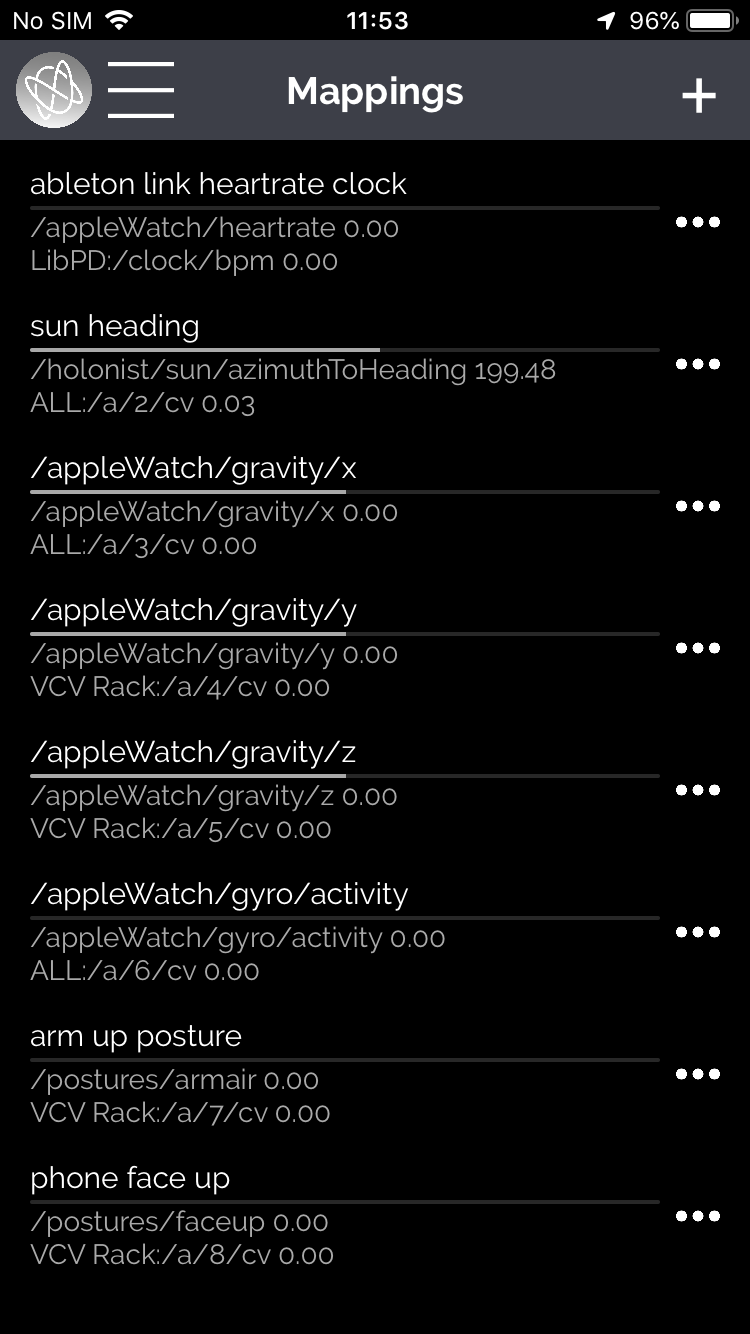
Mappings
Mappings are the core feature of Holon.ist, it’s where inputs are processed and routed to outputs.
Opening Mappings shows the values and meters of the current mappings. Tap the mapping to open the editor. Slide to the left, or tap the icon to disable, duplicate or delete.
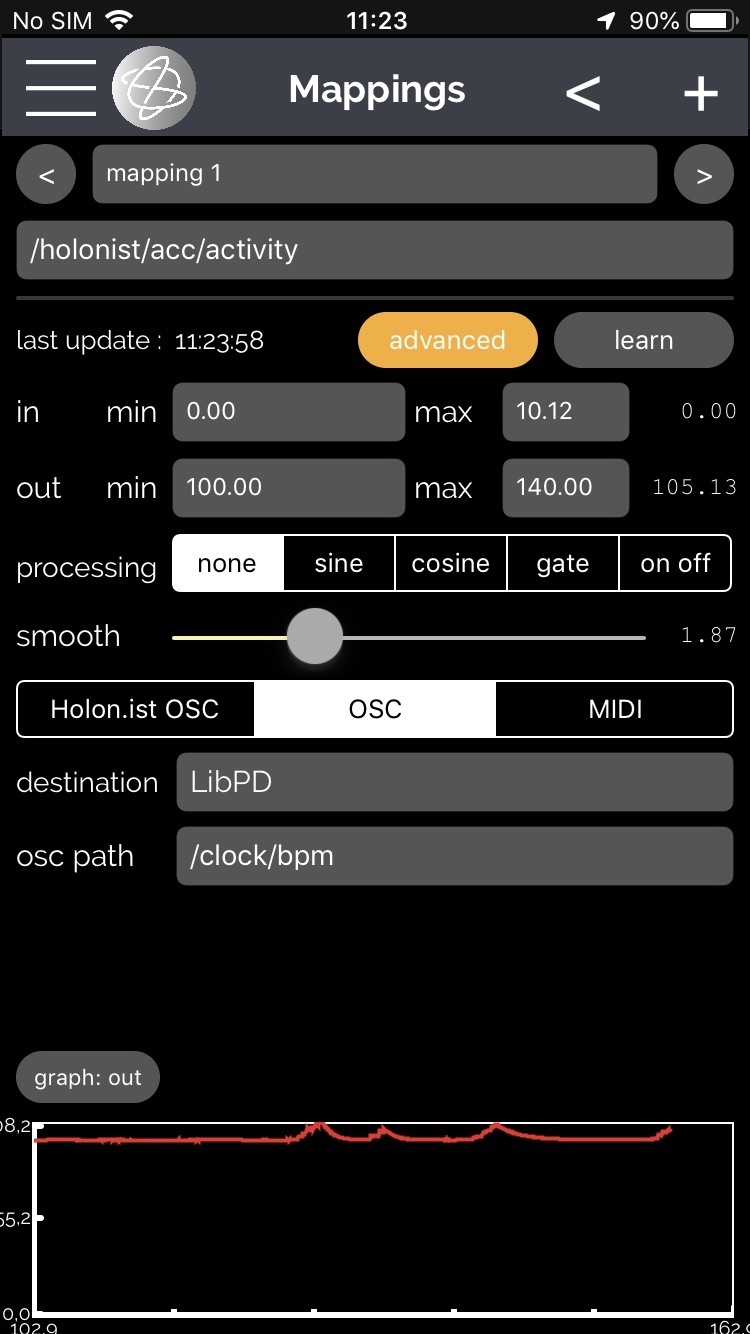
A learn function is available for autoscaling of minimum and maximum values. Press Learn to start and stop the procedure.
Manual adjustment is also available by pressing the Advanced button. This allows you to constrain input and output values to a specific range.
Mozzarellieri’s morsel: Processing lets you apply a cosine or sine transformation (very useful for course and heading), or to transform the signal into a gate/binary signal.
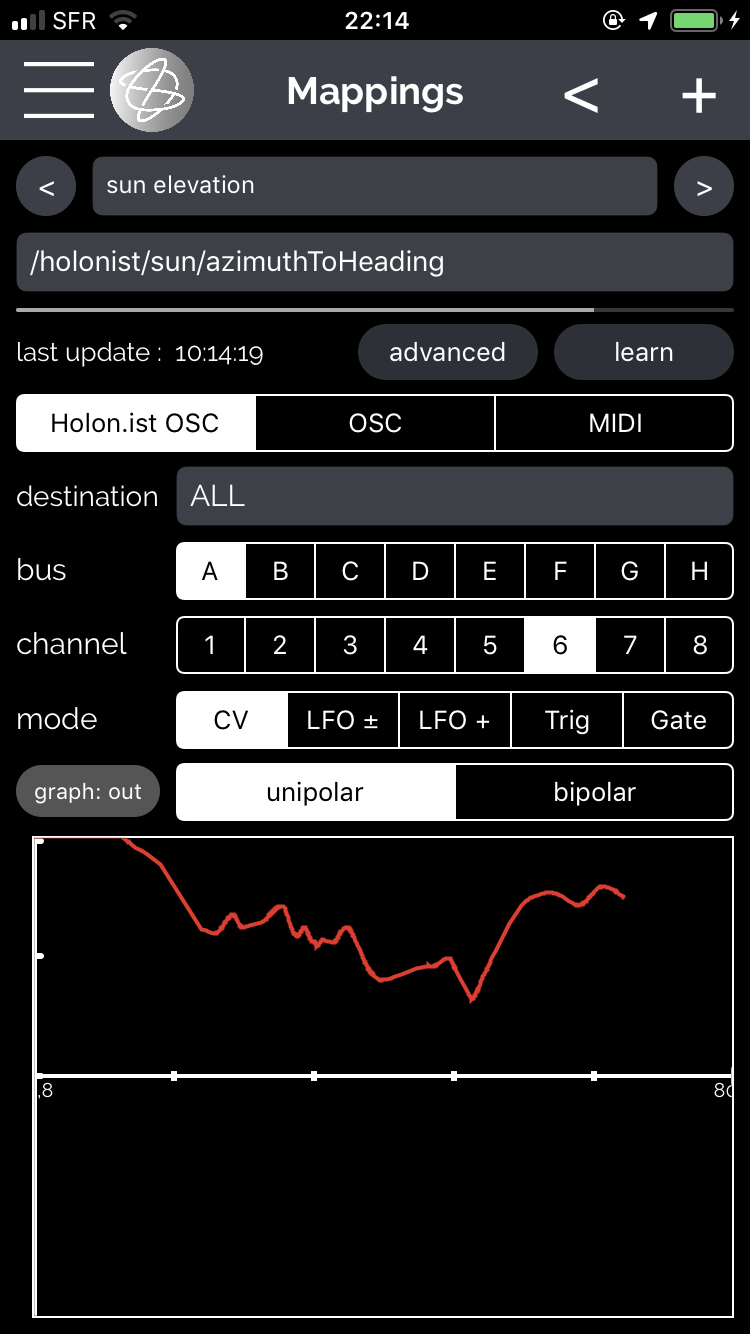
Besides sending to a chosen OSC destination, there is also a default Holon.ist OSC output named ALL. This broadcasts the selected OSC messages to all destinations discovered or manually configured on the network. The feature is especially useful for setting up and testing purposes. Note that OSC bandwidth decreases when used with mappings that contain multiple OSC paths.
Outputs
Outputs let you configure your output destinations.
OSC
Holon.ist supports flexible OSC routing:
- Holon.ist OSC: To connect Holon.ist OSC compatible devices, without having to configure their OSC paths.
- Custom OSC: Enables a user to connect Holon.ist to any OSC compatible software/device.
- libPD: OSC messages are sent to the embedded libPD/Pure Data engine.
- Internal: Allows you to create adaptive mappings by modifying min/max values, send values to scripts and much more.
- OSC input enables peer-to-peer connectivity.
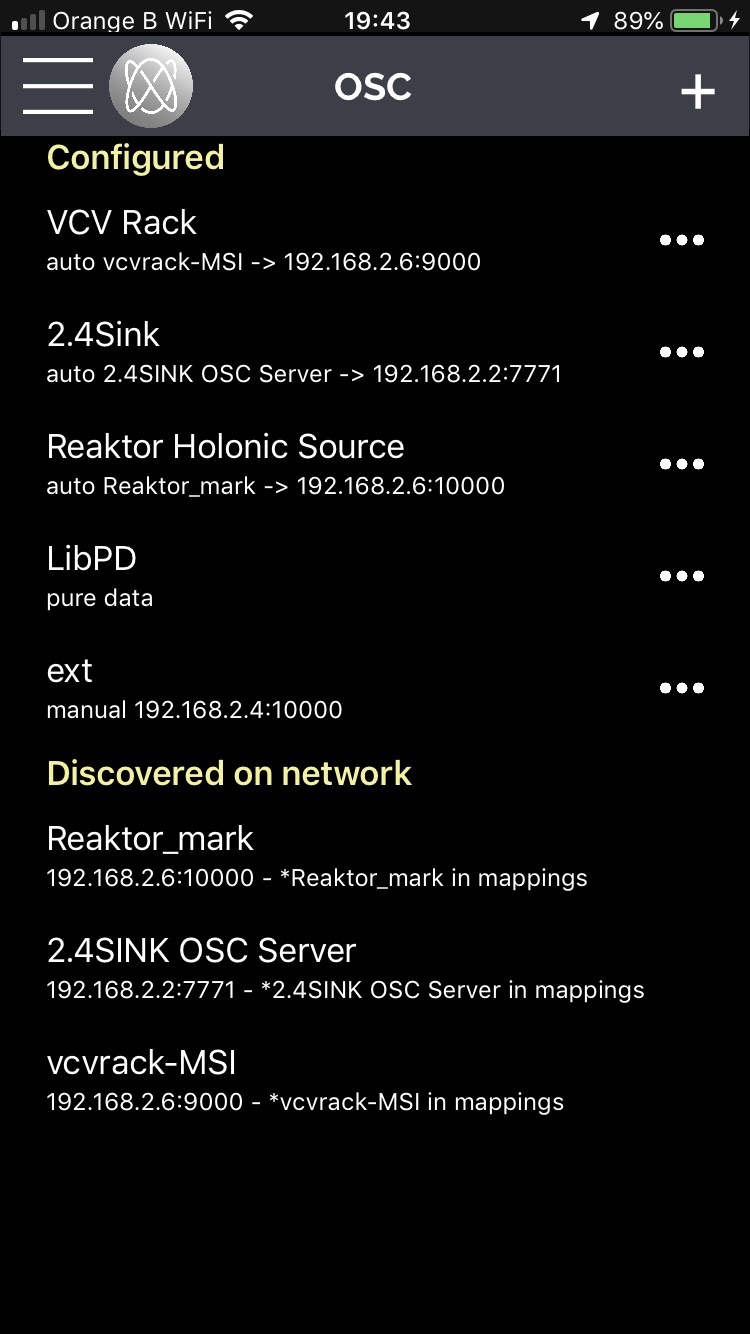
Holon.ist OSC
To configure a Holon.ist OSC destination, press New, select Type Automatic, this will show you a list of available discovered services. Select the desired service and name and save your configuration. Note that the IP address and port number are automatically added.
mDNS/bonjour is used for autodiscovery.MacOSHolon.ist automatically detects VCV Rack, Reaktor and Ableton Live when the Holonic Source plugin is loaded.Windows
- Requires Bonjour SDK from Apple to be installed: https://developer.apple.com/bonjour/
- Check that the Bonjour Service is running.
- For VCV Rack users on Windows, please follow the instructions below:
- Run the script Holonic_Source_windows.bat. This script can be found in the plugin folder
- c:\Users\\Documents\Rack\Plugins\HolonicSystems-Free\ The script publishes Holonic Source on the network to allow autodiscovery from Holon.ist app.
- The DOS window needs to remain open for the duration of the VCV session.
Linux
- Ensure Avahi is running.
- Run the script. Holonic_Source_linux.sh. This publishes Holonic Source on the network to allow autodiscovery.
- The shell window needs to remain open for the duration of the VCV session.
Tips
- Ensure that firewalls, such as Little Snitch, are not blocking communication.
- For instance, on MacOS, with Little Snitch firewall, incoming communication must be specifically enabled for Rack.
- As an alternative to autodiscovery, you can manually create an OSC output in Holon.ist by entering your IP and the port 9000.
Custom OSC
to be documented.
OSC message format
The Holonic Source OSC message format is used to ensure close integration with our Holon.ist app. In order to use Holonic Source with any other OSC compatible application, please select port 9000.
The message OSC path is /<bus>/<channel>/<mode> where:
- <bus> is one of a/b/c/d/e/f/g/h
- <channel> is one of 1/2/3/4/5/6/7/8
- <mode> is one of cv for unipolar CV, cvbi for bipolar CV.
For instance `/a/2/cv` will address channel 2 of bus a in CV mode.
Argument value should be a float. Holonic Source accepts values in [-1,1] range or in [-10,10] range depending on the switch configuration in the GUI. When [-1,1] is selected, values will effectively be multiplied by 10.
Peer to peer OSC
True two-way communication is possible with Holon.ist. This makes all kinds of feedback and other interactions possible between different devices and users. For example, you could send heading from a mobile device to another tethered to a MIDI device.
To send OSC messages to an external device, go to Outputs, create an OSC destination and name it as you wish (e.g. external). Select Manual, enter the IP of the external device and use port 10000.
Then, create a mapping that receives the OSC message you just created and select OSC (the middle button). Choose your OSC destination (E.g. External) and OSC path (E.g. /iPadActivity)
Now, on your receiving device, make a new mapping and select your OSC path to be received (E.g. /iPadActivity). Any outputs you send to an external device are broadcast automatically to receiving devices and are available as mapping inputs.
MIDI
The following options are available: RTP MIDI, BLE MIDI, USB MIDI.
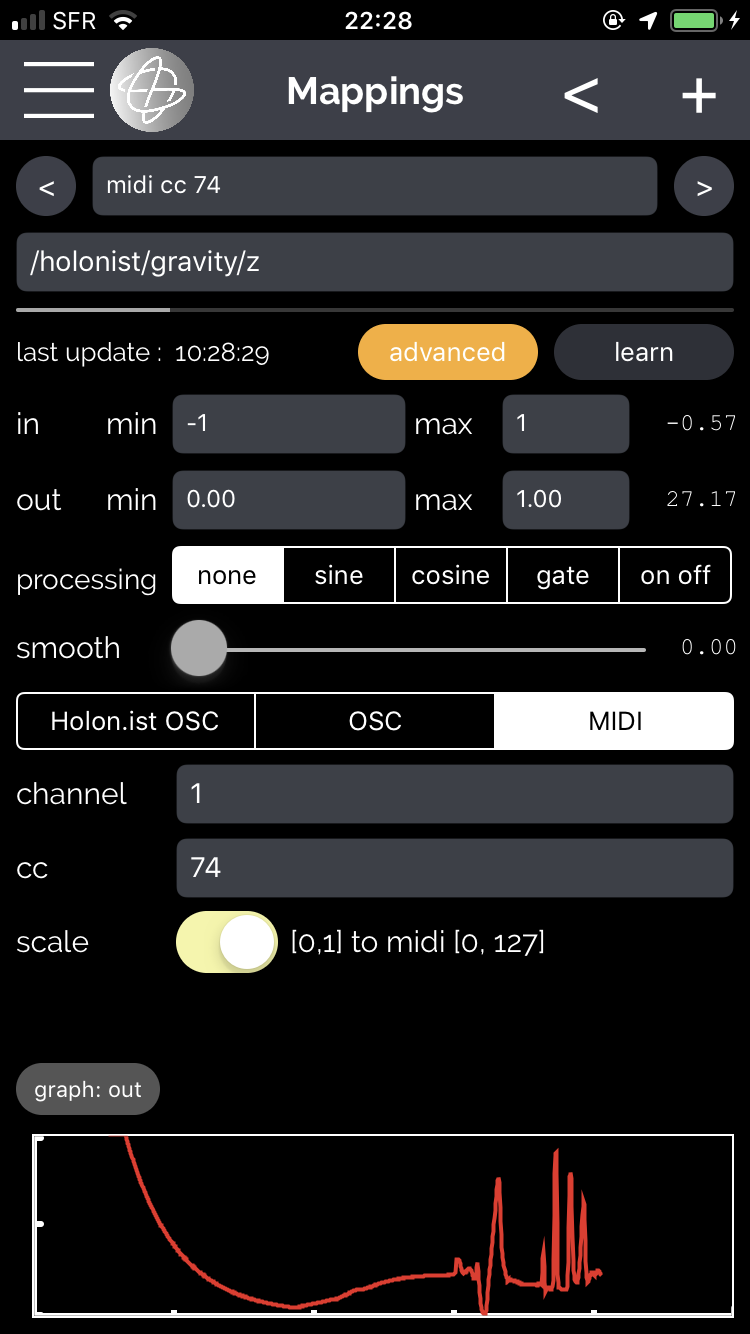
MIDI CC’s are configured in the mapping. Ensure the Scale switch is set to a suitable range (MIDI CC Min/Max is 0 to 127).
Please note: While MIDI CC outputs are natively supported, Holon.ist MIDI triggers are created inside a configurable PureData patch. If you need to create MIDI notes inside Holon.ist, you can open the preset called “demo_pd_midi” and configure the mappings. We highly recommend you use miRack to create any MIDI processing and output configurations very easily.
Known issues:
– In order to send MIDI from Holon.ist, it is recommended that you open MIDI/AU host devices before opening Holon.ist. You can always re-open Holon.ist afterwards, as it autosaves your configuration.
– AUM users should select “AUM Destination” in the MIDI Routing, NOT Holon.ist Virtual MIDI.
Pure Data
Pure Data is a real-time graphical programming environment for audio processing. Holon.ist lets you load a PD Vanilla compatible patch.
Embedded Pure Data (LibPD) lets create your own instruments and musical rules for places, sports, games, or anything involving movement and micromovements.
The embedded Pure Data (libPD) implementation in Holon.ist supports audio, MIDI and OSC inputs and outputs.
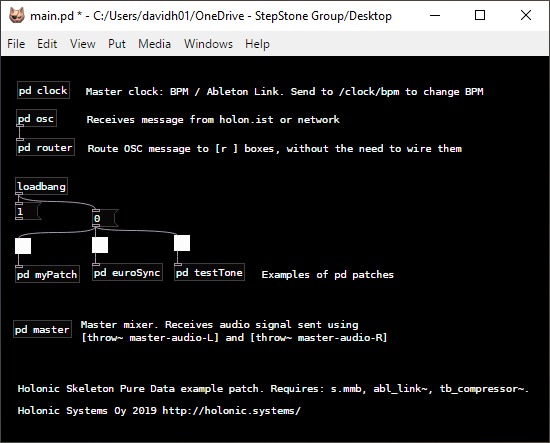
You can edit and build PD patches for Holon.ist on your computer. Mail one of the demo presets to yourself and save it on your computer. Change the file extension from .holonist to .zip. Contained is a file named “main.pd”. This is the root of the PD patch and is what Holon.ist looks for when loading.
All our demo patches contain the same Pure Data Holonic Skeleton which allows you to:
Use Ableton Link. Send messages to LibPD /clock/bpm to change the BPM.
Easily route OSC messages. The OSC messages are converted to a PD compatible format (slashes are replaced with spaces) which allows you to [route] messages. The message router also sends the message directly to the corresponding box. For example: sending /partA/partB/partC 1.0 to libPD from holon.ist, the box [r partA] receives “partB partC 1.0”, and you can further [route] messages from here on.
Please find among the presets some templates to use as starting points.
Tip: It is possible to run PD patches on your computer and send OSC to the message router in the example PD file called Holonic Skeleton. By default the Holon.ist Pure Data Skeleton listens for OSC messages on port 5000. Once complete, you may then transfer the PD patch to your phone. To do this, simply compress the PD patch to a .zip file and rename it to .holonist. This allows you to install the PD file on your phone, via email, for example.
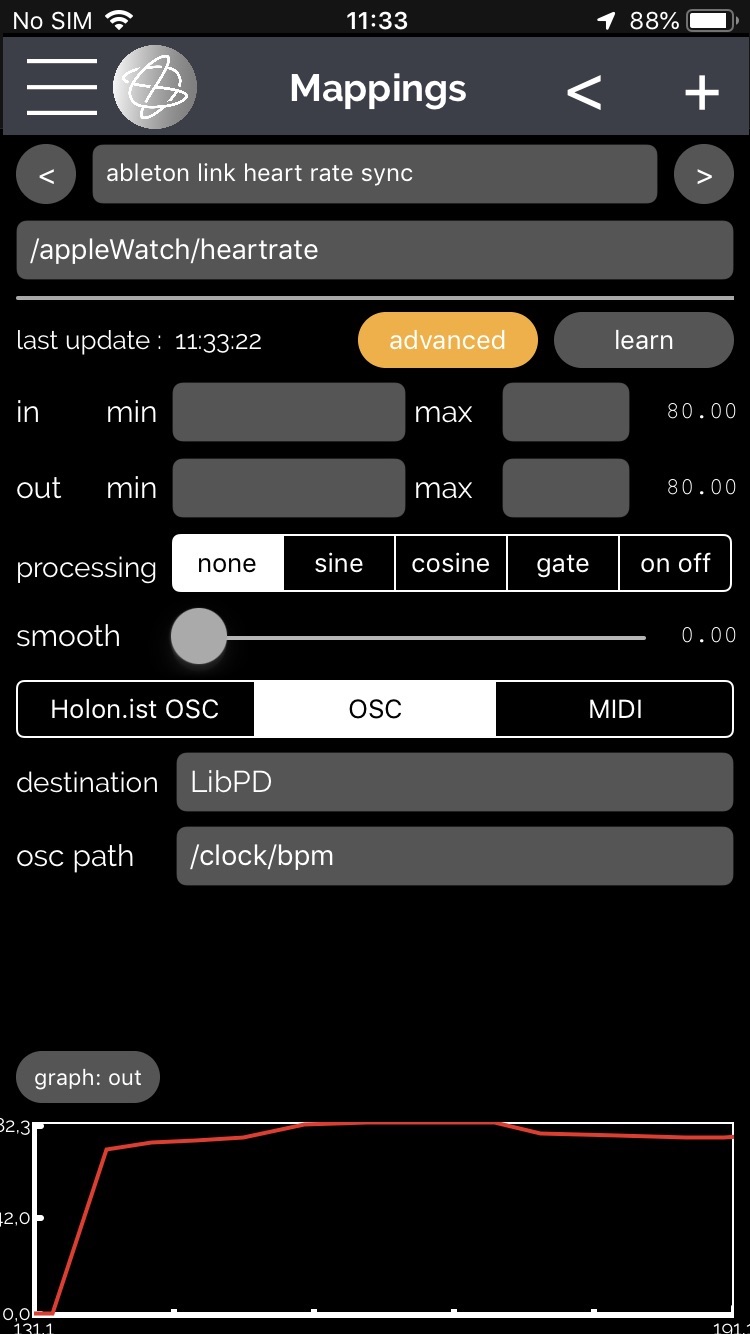
Using Ableton Link with Holon.ist gives you power over tempo like never before. Fully, or only partially under your conscious control.
Escueleries proposition: Heart rate clock. This feature lets you clock an entire studio from your heart rate, using Apple Watch or Movesense. Please leave the min/max values empty in this use case as they are not needed for this type of mapping.
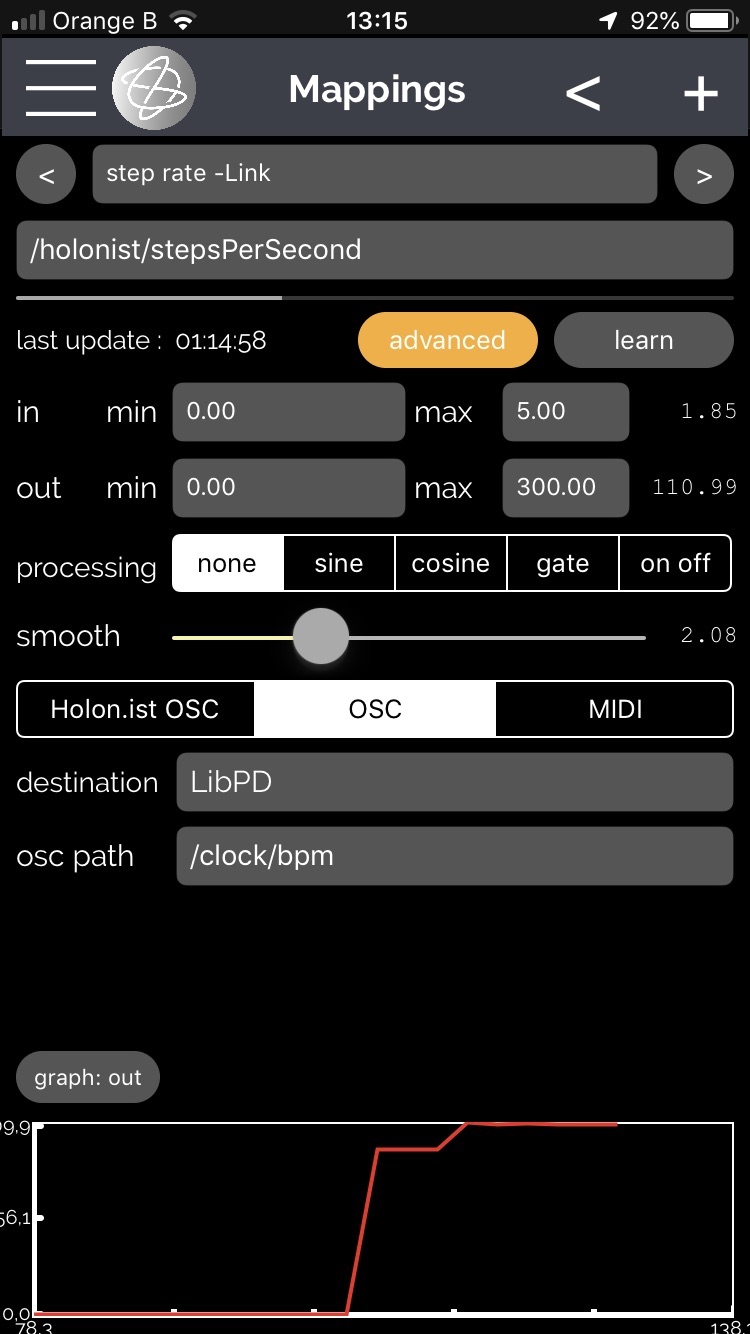
Step rate controlled tempo is another good biomechanical clock. To make a mapping for this, use /holonist/stepsPerSecond. Your min/max output ranges should reflect a multiplication of 60 to turn this sensor value into a usable tempo range. E.g. 1.5 steps per second = 90 BPM, 2 steps per second = 120 BPM etc.
- Another interesting technique could be using your activity to modulate the tempo.
- Press Learn to detect the values of your chosen activity.
- Set the min/max output values to your chosen tempo rubato.
- Some smoothing is advised when modulating tempo.
Chef’s tip: You can really use anything to modulate the clock. Time of day, sun position, altitude etc.
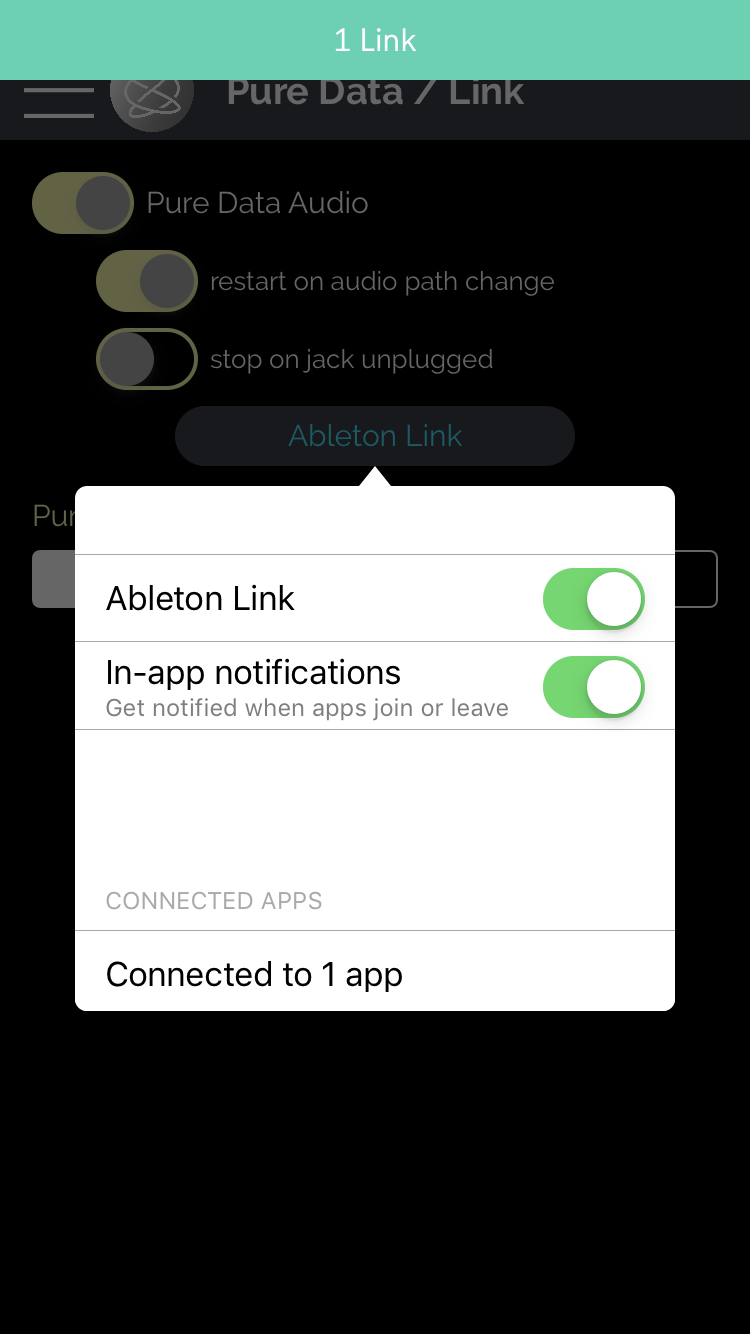
All Link mappings must be sent to the destination LibPD and the OSC path /clock/bpm. The PD vanilla patch must be loaded for this, it is included with all default presets. Be sure to enable Pure Data and Link in the Pure Data/Link section as shown below.
miRack
For information about our modules, see Holonic Systems plugins for VCV Rack and miRack.
miRack patches can be embedded in Holon and Holonist presets with the procedure listed below.
Holonic preset workflow
Create your miRack patch
- Open Holonist. From Presets, select the POI Holonist template mapping. To enable Land Use features, select the LULCPOI Holonist preset*
- Ensure the internal miRack engine is OFF in Holonist’s Outputs**
- Open miRack and use the Holonic template as a starting point***
- Use compatible modules to build your patch, look for the Holonic icon next to the module in the miRack browser. Save your miRack patch.
Export miRack patch to Holonist preset
- Open the file manager in miRack, select “Open existing” and “Share” the patch to Holonist from the menu.
- Switch to miRack and close miRack by swiping up.
- Switch back to Holonist and re-enable miRack in the Output section.
- Go to Presets, name the file and press Save.
Share Holonist preset to Holon:
- To open the Share function, tap the three dots next to the Holonist preset.
- Use AirDrop or email to send it to our free Holon app on your phone, friends etc.
* For LULC and POI features to work, ensure your area is covered by the Holonic spatial computing system. View current map
** Holonist OSC won’t transmit to miRack unless this step is completed and miRack will need to be restarted.
*** View section on patching and data recording below.
Ableton Link
to be documented.
Utilities
Presets
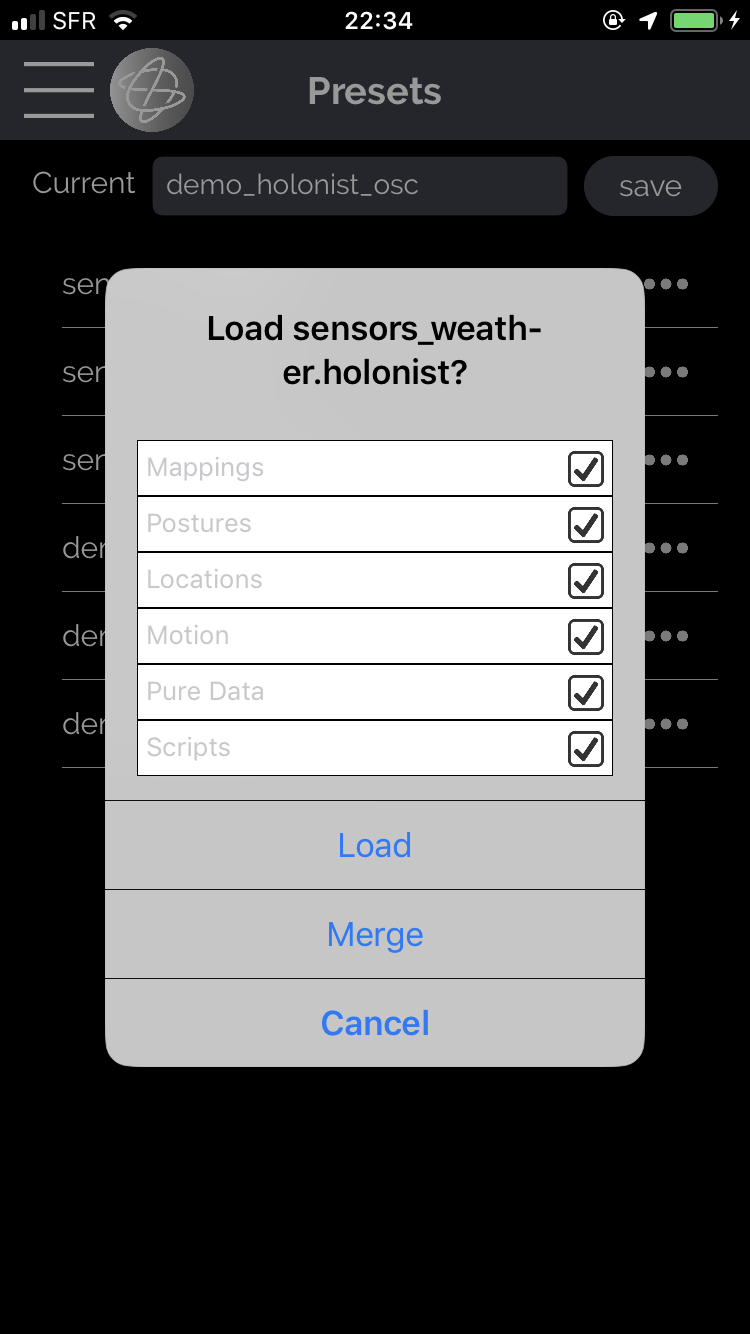
Presets contain Mappings, Postures, Locations, Motion, the current PD patch, the current miRack patch and Scripts.
Presets are accessed through the Utilities menu. Initially, Holon.ist opens with a preset called demo_holonist_osc. It includes mappings for the Holonic Source demo patches and can be loaded at any time. The mappings include a taste of the many possibilities Holonic Source offers.
Also included are the following presets, which can be used as building blocks:
- sensors_weather – Temperature, cloud cover, humidity, wind speed, wind direction, air pressure, sun elevation, moon elevation.
- sensors_iphone – Gravity/x/y/z, gyroscope, heading, rotation, sun azimuth to heading, moon/azimuth to heading.
- sensors_apple_watch – Gravity x//y/z, gyroscope, heart rate (Sends to LibPD which then sends the heart rate as a tempo via Link).
- demo_pd_midi – The demo patch generates MIDI notes from the following parameters that are sent to a libPD patch: /melody/density/, kick/density, hh/density, filter/freq. It generates notes on MIDI channels 1 and 10.
- demo_pd_audio – This simple audio preset can be useful as an introduction to PD. Otherwise, try to play the Dig Dug theme tune.
- demo_holonist_osc – The default preset that can be used as a starting point for mapping with Holonic Source. Autodiscovered OSC destinations include Reaktor 6, VCV Rack, and Ableton Live.
To save a Preset enter a name and press Save.
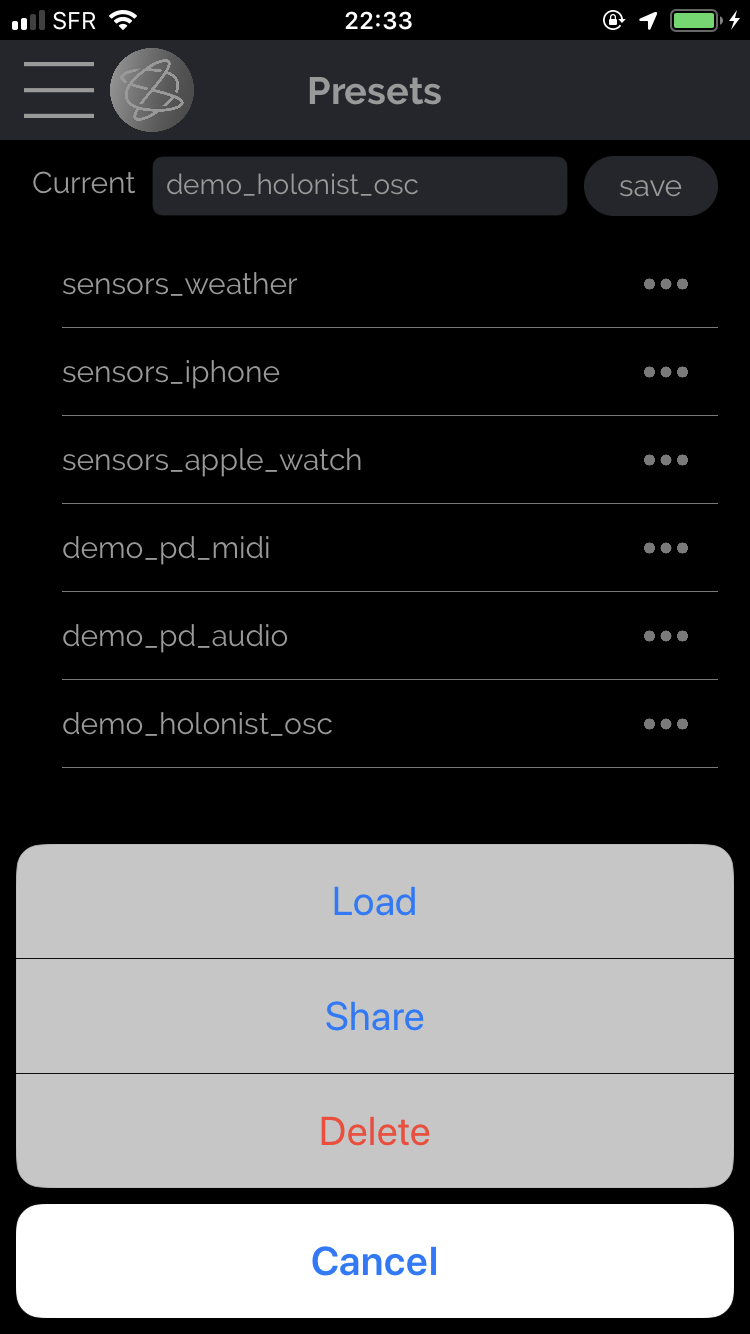
The Saved Preset then appears in the list below. Tapping the Preset icon (three dots) enables you to Load, Share or Delete.
Pressing Load gives you the option to Load (deletes previous mappings), Merge (adds mappings to existing). At this stage you may choose to Load/Merge individual components of the Preset as shown below. This lets you combine parts of different presets.
A message from the kitchen: Please note that for the time being, when Merging, you are required to manually assign the output destinations, in order to avoid duplicate outputs.
Presets can be shared with other users, via email or Airdrop, for example. Presets can be imported from email by pressing the standard Share button (top right) and by selecting “Copy to Holonist” from the menu. You can then choose whether to import the file to the list of saved presets, or to load it immediately. When sharing presets, some settings are excluded, such as your OSC destinations.
Presets are just zip files. By renaming the extension to .zip, you may inspect the contents.
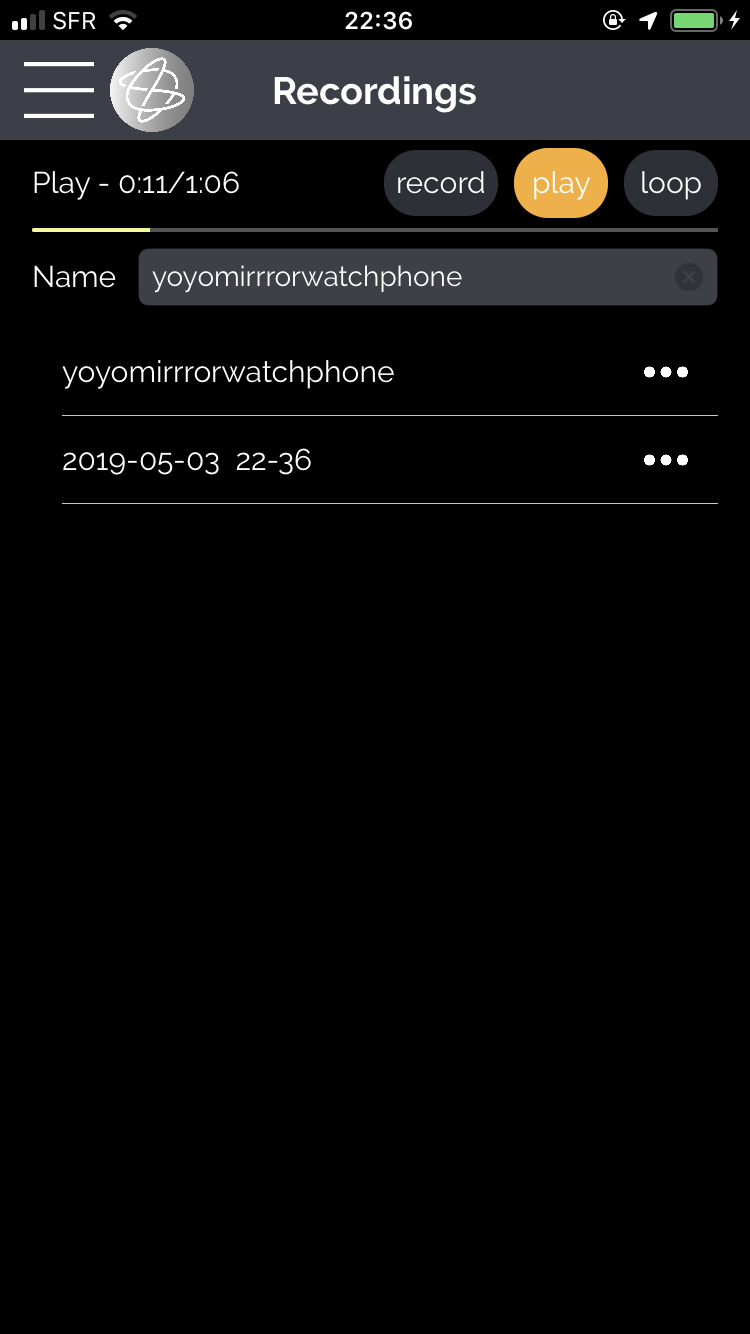
Recordings and Patching
Record raw data from the sensor streams and play them back in either one shot or loop mode. This feature is essential for mapping spatial parameters and movement.
Recordings can be loaded and shared by tapping the icon on the right of the file name.
To get started with patching using spatial computing features, such as POIs (Points Of Interest) and LULC (Land use/Land cover), you can download this data recording that features the main land use areas (190Mb).
When patching in miRack, you can use the Holonic templates and demo files provided with miRack, they contain some notes that further explain the signal flow.
The modules of the manufacturers listed below are currently compatible with Holon and Holon.ist (a small Holonic icon marks the supported modules inside miRack):
AudibleInstruments
Autodafe
Befaco
BogaudioModules
DHE-Modules
HolonicSystems
ImpromptuModular
MI
ML_modules
MSM
PurrSoft
SquinkyLabs
Valley
Hetrickcv
mscHack
skylights
trowaSoft
vcv-link
When testing and using, ensure that you are in an area enabled by the Holonic system, the current coverage is shown on this map: Holonic World. You can always request us to add the area with this form: Holonic Coverage Request
For your own recordings, name your recording and press save.
Press record to start and stop recording.
The sliders set the loop points for playback.
Logs
Holon.ist keeps a log of events for debugging purposes.
Multiuser
Multiuser mode enables users on the same network to sync. Ensure that Ableton Link is enabled in Outputs.
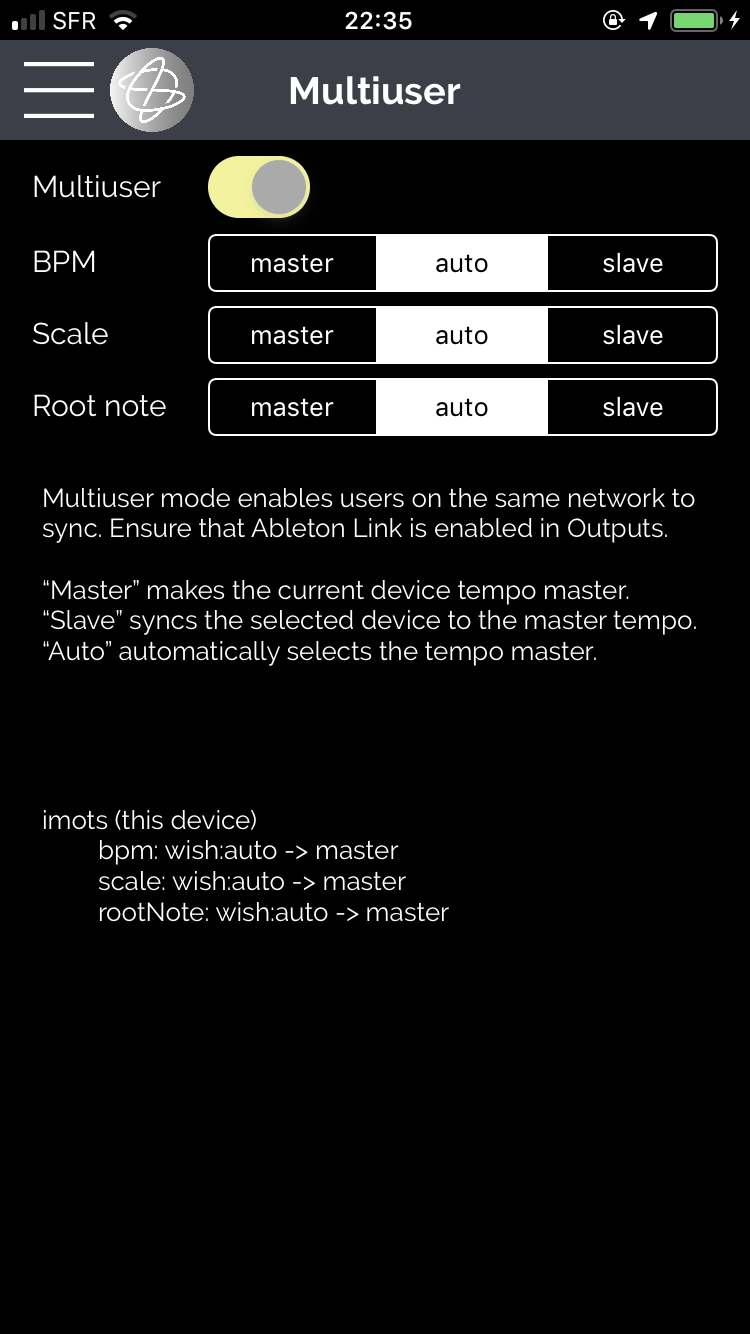
- “Master” makes the current device tempo leader.
- “Slave” makes the current device to the tempo follower.
- “Auto” automatically selects the tempo leader.
Saucier’s suggestion: This screen is useful for finding IP addresses of other Holonic devices on the same WiFi network.
Manual
This manual is also available in the app, accessible from the Utilities menu.
Support
We are constantly working on improving Holon.ist and your feedback is very much appreciated. Please send any bug reports, feature requests and questions to: info@holonic.systems